# 基础
# 模板语法和 Attribute 绑定
模板语法
1
2
3
4
5
6
| <script setup>
const a=1
</script>
<template>
<div>{{ a }}</div>
</template>
|
Attribute 绑定 ":"
1
2
3
4
5
6
| <script setup>
const isDisabled="False"
</script>
<template>
<button :datafld="isDisabled">按钮</button>
</template>
|
# 响应式
# 响应式 ref
1
2
3
4
5
6
7
8
9
10
11
| <script setup>
import {ref} from "vue";
const test =ref(0)
const a =()=>{
test.value++
console.log()
}
</script>
<template>
<button @click="a" >{{test}}</button>
</template>
|
通过 js 引入的时候使用
响应式渲染会出现还没有显示出来这个时候页面会短暂出现
这个时候可以使用 v-cloak
1
2
3
4
5
6
7
| <style>
[v-cloak]{
display: none;
}
</style>
<!--或者-->
<div v-cloak></div>
|
# reactive
有局限性不推荐
- 有限的值类型
- 不能替换整个对象
- 对解构操作不友好
# DOM 更新时机
1
2
3
4
5
6
7
8
9
10
11
12
13
14
| <script setup>
import {ref,nextTick} from "vue";
const test =ref(0)
const a =async ()=>{
test.value++
console.log(document.getElementById("but").textContent)
await nextTick()
// DOM更新后
console.log(document.getElementById("but").textContent)
}
</script>
<template>
<button @click="a" id="but">{{ test }}</button>
</template>
|
第一次点按钮会打印出 0 和 1
# 计算属性
1
2
3
4
5
6
7
8
9
10
11
12
13
14
15
16
17
18
19
20
21
22
| <script setup>
import { reactive, computed } from 'vue'
const author = reactive({
name: 'John Doe',
books: [
'Vue 2 - Advanced Guide',
'Vue 3 - Basic Guide',
'Vue 4 - The Mystery'
]
})
// 一个计算属性 ref
const publishedBooksMessage = computed(() => {
return author.books.length > 0 ? 'Yes' : 'No'
})
</script>
<template>
<p>Has published books:</p>
<span>{{ publishedBooksMessage }}</span>
</template>
|
计算属性值会基于其响应式依赖被缓存
所以推荐计算属性
可写计算属性
1
2
3
4
5
6
7
8
9
10
11
12
13
14
15
16
17
18
19
20
| <script setup>
import { ref, computed } from 'vue'
const firstName = ref('John')
const lastName = ref('Doe')
const fullName = computed({
// getter
get() {
return firstName.value + ' ' + lastName.value
},
// setter
set(newValue) {
// 注意:我们这里使用的是解构赋值语法
[firstName.value, lastName.value] = newValue.split(' ')
}
})
fullName.value = 'ab ab'
</script>
|
# 类和样式绑定
# 内联字面量
1
2
3
4
5
6
7
8
9
10
11
12
| <script setup>
import { ref, computed } from 'vue'
const isActive = ref(true)
const hasError = ref(false)
</script>
<template>
<div
class="static"
:class="{ active: isActive, 'text-danger': hasError }"
>123</div>
</template>
|
渲染后
1
| <div class="static active"></div>
|
# 绑定对象
1
2
3
4
5
6
7
8
9
10
11
12
13
14
| <script setup>
import { reactive, computed } from 'vue'
const classObject = reactive({
active: true,
'text-danger': false
})
</script>
<template>
<div
class="static"
:class="classObject"
>123</div>
</template>
|
# 绑定计算属性
1
2
3
4
5
6
7
8
9
10
11
12
13
14
15
16
17
| <script setup>
import {ref, computed, reactive} from 'vue'
const isActive = ref(true)
const error = ref(null)
const classObject = computed(() => ({
active: isActive.value && !error.value,
'text-danger': error.value && error.value.type === 'fatal'
}))
</script>
<template>
<div
class="static"
:class="classObject"
>123</div>
</template>
|
# 绑定数组
1
2
3
4
5
6
7
8
9
| <script setup>
import {ref, computed, reactive} from 'vue'
const activeClass = ref('active')
const errorClass = ref('text-danger')
</script>
<template>
<div :class="[activeClass, errorClass]"></div>
</template>
|
三元表达式
1
2
3
| <template>
<div :class="[isActive ? activeClass : '', errorClass]"></div>
</template>
|
# 条件渲染和列表渲染
# v-if,v-else-if,v-else
1
2
3
4
5
6
7
8
9
10
| <script setup>
import {ref, computed, reactive} from 'vue'
const a=ref(1)
</script>
<template>
<div v-if="a===0">123</div>
<div v-else-if="a===1">456</div>
<div v-else>789</div>
</template>
|
可以与 template 搭配使用
1
2
3
4
| <template>
<p>1</p>
<p>2</p>
</template>
|
渲染出来为
当 p1 和 p2 同时需要 v-if 时可以加在 template 上
同时使用 v-if 和 v-for 是不推荐的,因为这样二者的优先级不明显。请查看风格指南获得更多信息。
# v-show
总的来说,v-if 有更高的切换开销,而 v-show 有更高的初始渲染开销。因此,如果需要频繁切换,则使用 v-show 较好;如果在运行时绑定条件很少改变,则 v-if 会更合适。
1
2
3
4
5
6
7
8
9
10
| <script setup>
import {ref, computed, reactive} from 'vue'
const a=ref(1)
</script>
<template>
<div v-show="a===0">123</div>
<div v-show="a===1">456</div>
<button @click="a===1?a=0:a++">a+1</button>
</template>
|
# v-for
1
2
3
4
5
6
7
8
9
10
| <script setup>
import {ref, computed, reactive} from 'vue'
const a=ref(['a','b','c','d','e'])
</script>
<template>
<div v-for = '(v,i) in a'>
索引{{i}}的值为{{v}}
</div>
</template>
|
对象
1
2
3
4
5
6
7
8
9
10
11
12
13
| <script setup>
import {ref, computed, reactive} from 'vue'
const myObject = reactive({
title: 'How to do lists in Vue',
author: 'Jane Doe',
publishedAt: '2016-04-10'
})
</script>
<template>
<li v-for="(value, key, index) in myObject">
{{ index }}. {{ key }}: {{ value }}
</li>
</template>
|
# 事件处理和表单输入绑定
# 事件处理
# 监听事件
@click
1
2
3
4
5
6
7
8
| <script setup>
import {ref, computed, reactive} from 'vue'
const a=ref(0)
</script>
<template>
<button @click="a++">{{a}}</button>
</template>
|
# 在内联事件处理器中访问事件参数
1
2
3
4
5
6
7
8
9
10
11
12
13
14
15
16
17
18
19
20
| <script setup>
import {ref, computed, reactive} from 'vue'
function warn(message, event) {
// 这里可以访问原生事件
if (event) {
event.preventDefault()
}
alert(message)
}
</script>
<template>
<!-- 使用特殊的 $event 变量 -->
<button @click="warn('Form cannot be submitted yet.', $event)">
Submit
</button>
<!-- 使用内联箭头函数 -->
<button @click="(event) => warn('Form cannot be submitted yet.', event)">
Submit
</button>
</template>
|
event: 这是一个可选参数,通常是触发此函数的事件对象。例如,它可以是点击事件、提交事件等。
# 事件修饰符
.stop
1
2
3
4
5
6
7
8
9
10
11
12
13
14
15
16
17
18
19
| <script setup>
import {ref, computed, reactive} from 'vue'
const count=ref(0)
const fun = ()=>{
console.log("父div被点击")
}
const afun = ()=>{
console.log("a操作被点击")
}
const bfun = ()=>{
count.value++
}
</script>
<template>
<div @click="fun">
<div @click="afun">a操作</div>
<div @click.stop="bfun">b操作:计数:{{count}}</div>
</div>
</template>
|
当点击 b 操作时,因为 b 操作的事件被.stop 修饰,所以 fun 方法不会被执行,而 a 操作反之
.prevent
1
2
| <!-- 提交事件将不再重新加载页面,只会执行onSubmit里的内容 -->
<form @submit.prevent="onSubmit"></form>
|
.self
.capture
.once
.passive
1
2
3
4
5
6
7
8
9
10
11
12
13
14
15
16
17
18
19
20
21
22
23
24
25
26
27
28
| <template>
<!-- 单击事件将停止传递 -->
<a @click.stop="doThis"></a>
<!-- 提交事件将不再重新加载页面,只会执行onSubmit里的内容 -->
<form @submit.prevent="onSubmit"></form>
<!-- 修饰语可以使用链式书写 -->
<a @click.stop.prevent="doThat"></a>
<!-- 也可以只有修饰符 -->
<form @submit.prevent></form>
<!-- 仅当 event.target 是元素本身时才会触发事件处理器 -->
<!-- 例如:事件处理器不来自子元素 -->
<div @click.self="doThat">...</div>
<!-- 添加事件监听器时,使用 `capture` 捕获模式 -->
<!-- 例如:指向内部元素的事件,在被内部元素处理前,先被外部处理 -->
<div @click.capture="doThis">...</div>
<!-- 点击事件最多被触发一次 -->
<a @click.once="doThis"></a>
<!-- 滚动事件的默认行为 (scrolling) 将立即发生而非等待 `onScroll` 完成 -->
<!-- 以防其中包含 `event.preventDefault()` -->
<div @scroll.passive="onScroll">...</div>
</template>
|
# 按键修饰符
.enter
.tab
.delete (捕获 “Delete” 和 “Backspace” 两个按键)
.esc
.space
.up
.down
.left
.right
1
| <input @keyup.enter="count++" v-model="count">
|
# 系统按键修饰符
你可以使用以下系统按键修饰符来触发鼠标或键盘事件监听器,只有当按键被按下时才会触发。
.ctrl
.alt
.shift
.meta
1
2
3
4
5
| <!-- Alt + Enter -->
<input @keyup.alt.enter="clear" />
<!-- Ctrl + 点击 -->
<div @click.ctrl="doSomething">Do something</div>
|
# 鼠标按键修饰符
.left
.right
.middle
# 表单输入绑定
# 侦听器
# watch
计算属性允许我们声明性地计算衍生值。然而在有些情况下,我们需要在状态变化时执行一些 “副作用”:例如更改 DOM,或是根据异步操作的结果去修改另一处的状态。
在组合式 API 中,我们可以使用 watch 函数在每次响应式状态发生变化时触发回调函数
watch (侦听对象,回调函数)
1
2
3
4
5
6
7
8
9
10
11
12
13
14
15
16
17
18
19
20
21
22
| <script setup>
import {ref, watch} from 'vue'
const question = ref("")
const answer = ref("答案")
const loading = ref(false)
watch(question,(newQuestion) => {
if (newQuestion.includes("?")){
loading.value = true;
answer.value = "Thinking...";
setTimeout(()=>{
answer.value = "是的";
},1000)
}
})
</script>
<template>
<p>
提问问题
<input v-model="question" :datafld="loading">
</p>
<p>{{ answer }}</p>
</template>
|
监听答案是否有问号
侦听数据源类型
ref (计算属性)
响应式对象
getter 函数】
多个数据源组成的数组
1
2
3
4
5
6
7
8
9
10
| <script setup>
import {ref, watch} from 'vue'
const obj = ref({count:0})
watch(obj.value, () => {
console.log(obj.value.count)
})
</script>
<template>
<button @click="obj.count++">按钮</button>
</template>
|
watch 默认是懒执行的:仅当数据源变化时,才会执行回调
如果想要页面初始化 (刷新) 就执行
1
2
3
4
5
6
7
8
9
10
| <script setup>
import {ref, watch} from 'vue'
const obj = ref({count:0})
watch(obj.value, () => {
console.log(obj.value.count)
},{immediate: true})
</script>
<template>
<button @click="obj.count++">按钮</button>
</template>
|
一次性侦听器
源变化时触发一次,即只有第一次数据变化会触发回调函数
1
2
3
4
5
6
7
8
9
10
| <script setup>
import {ref, watch} from 'vue'
const obj = ref({count:0})
watch(obj.value, () => {
console.log(obj.value.count)
},{once: true})
</script>
<template>
<button @click="obj.count++">按钮</button>
</template>
|
# watchEffect
1
2
3
4
5
6
7
8
9
10
11
12
| <script setup>
import {ref, watch, watchEffect} from 'vue'
const obj = ref({count:0})
const obj2= ref({count:0})
watchEffect(() => {
console.log(obj.value.count,obj2.value.count)
},)
</script>
<template>
<button @click="obj.count++">按钮</button>
<button @click="obj2.count++">按钮</button>
</template>
|
watch 只追踪明确侦听的数据源。它不会追踪任何在回调中访问到的东西。另外,仅在数据源确实改变时才会触发回调。watch 会避免在发生副作用时追踪依赖,因此,我们能更加精确地控制回调函数的触发时机。
watchEffect,则会在副作用发生期间追踪依赖。它会在同步执行过程中,自动追踪所有能访问到的响应式属性。这更方便,而且代码往往更简洁,但有时其响应性依赖关系会不那么明确。
# 模板引用
ref
访问底层的 Dom 元素
1
2
3
4
5
6
7
8
9
10
| <script setup>
import {onMounted, ref, watch, watchEffect} from 'vue'
const input = ref()
onMounted(()=>{
console.log(input)
})
</script>
<template>
<input ref="input" />
</template>
|
v-for 的模板引用
1
2
3
4
5
6
7
8
9
10
11
12
13
| <script setup>
import {onMounted, ref, watch, watchEffect} from 'vue'
const itemRefs = ref()
const list = ref([1,2,3])
onMounted(()=> console.log(itemRefs.value))
</script>
<template>
<ul>
<li v-for="item in list" ref="itemRefs">
{{item}}
</li>
</ul>
</template>
|
这样也是能打印出 Dom 的
使用场景
获取某个元素的位置,宽高
子组件的内容
# 生命周期函数
onMounted()
执行定时器,绑定事件,订阅消息
在组件挂在完成后执行
onUnmounted()
卸载定时器,绑定事件,订阅消息
组件卸载之后
例:
1
2
3
4
5
6
7
8
9
10
11
12
13
14
15
16
17
| <script setup>
import {onMounted, onUnmounted, ref, watch, watchEffect} from 'vue'
const data = ref("");
let setTimeoutId = null
onMounted(()=> {
setTimeoutId = setTimeout(()=>{
data.value = "1234"
}, 100)
})
onUnmounted(()=>{
clearTimeout(setTimeoutId)
})
</script>
<template>
<div>数据:</div>
<div>{{data}}</div>
</template>
|
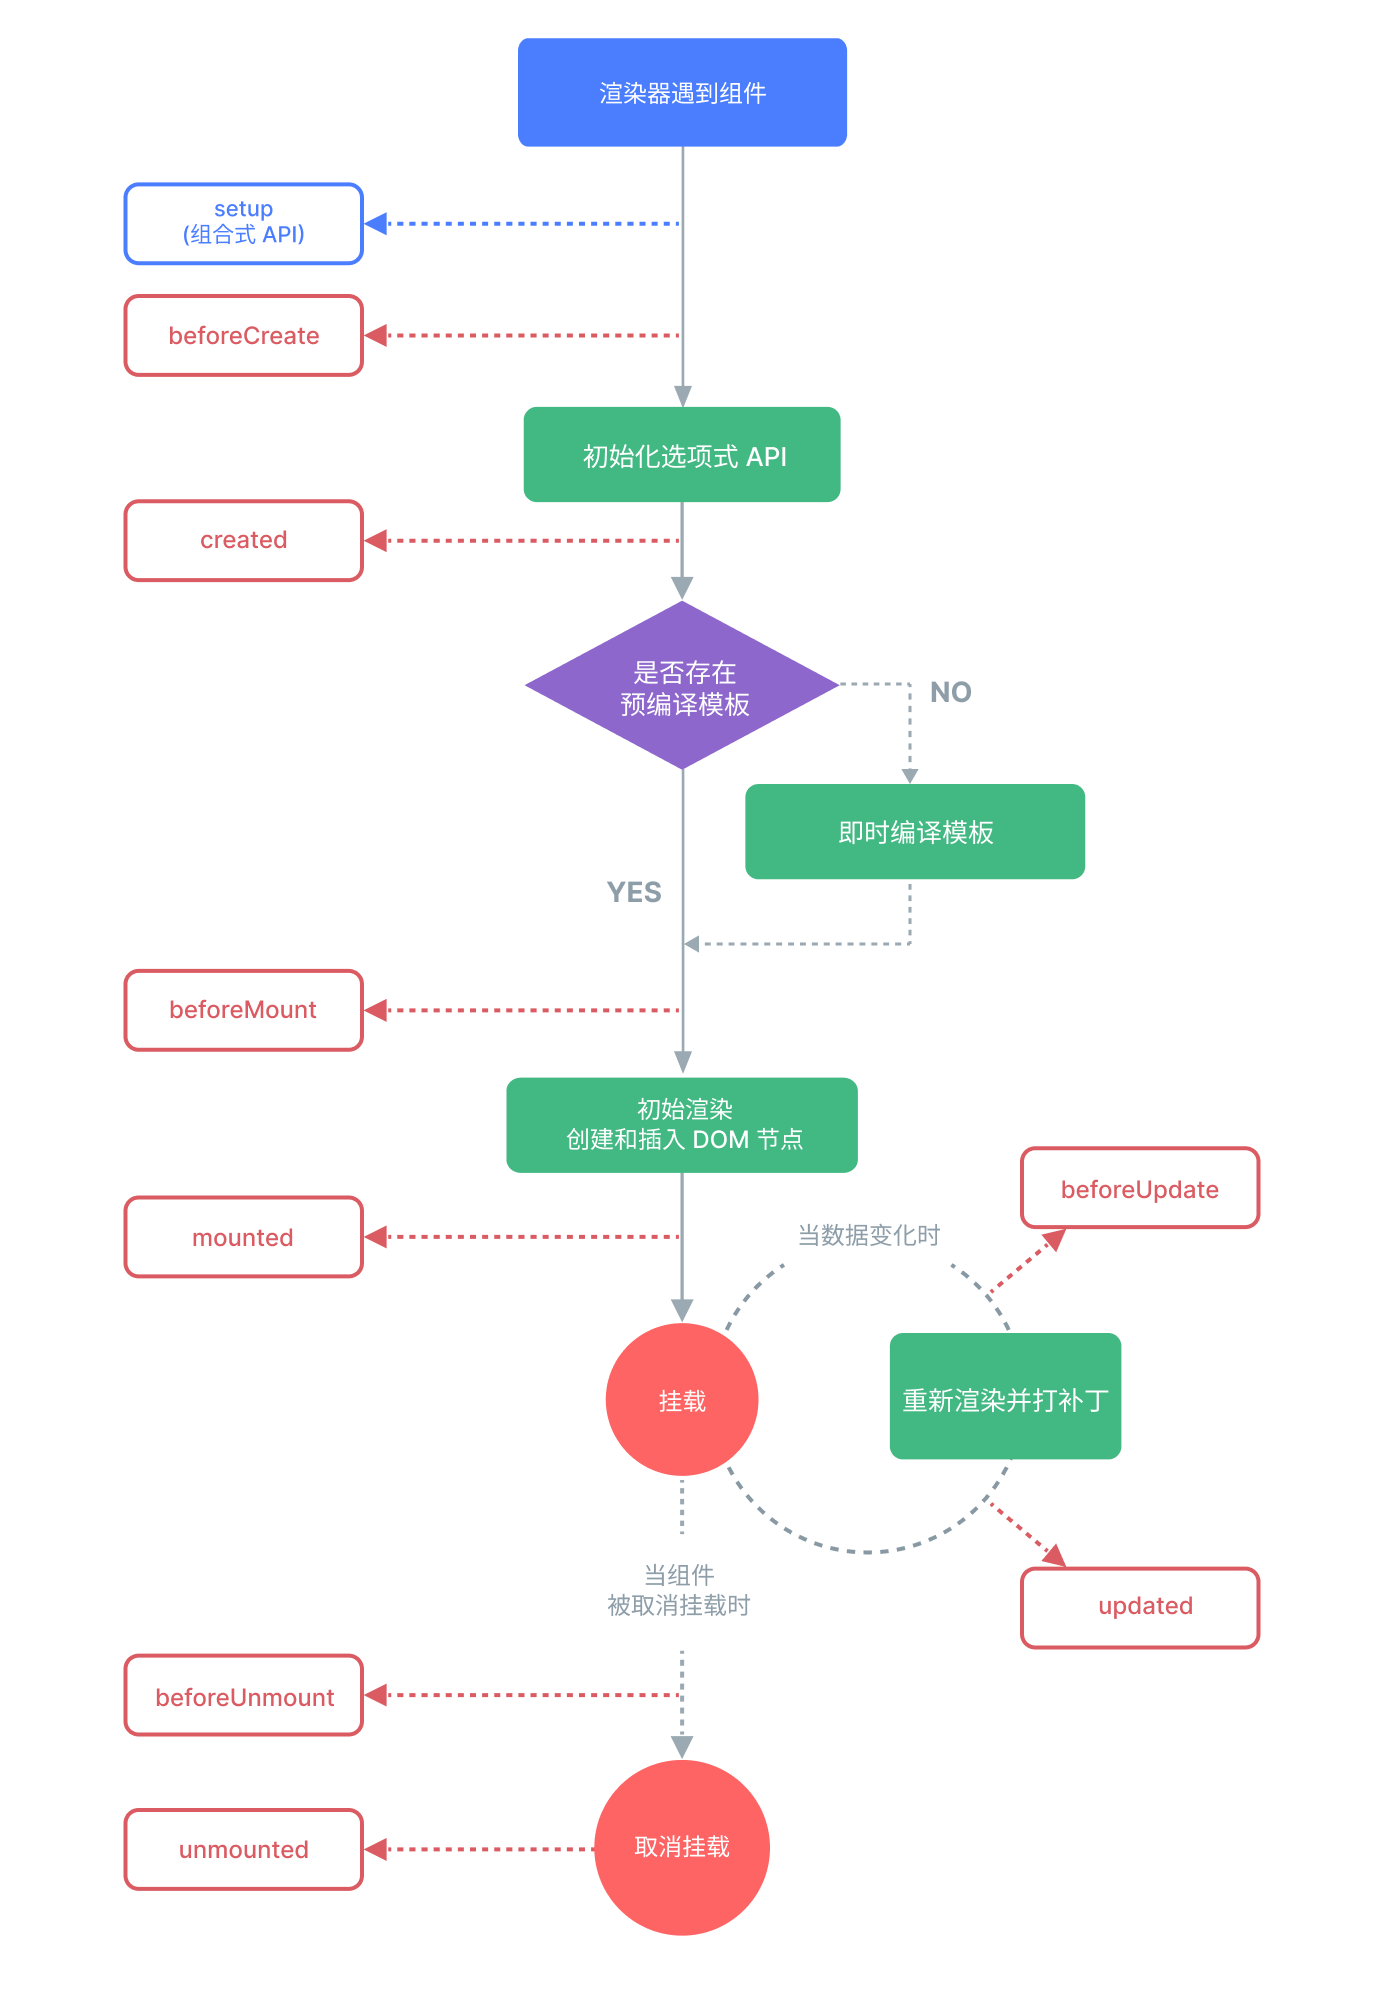
# 生命周期流程
![生命周期]()
# setup
创建之前和创建之后
1
2
3
4
5
6
7
| <script setup>
import {onMounted, onUnmounted, ref, watch, watchEffect} from 'vue'
console.log(document.getElementsByTagName("div")[0].textContent)
</script>
<template>
<div>数据</div>
</template>
|
像这个例子是获取不了 div 中的文字,因为 setup 的 script 中的 js,是生命周期创建时期 (setup),而 template 是在挂载之后所以获取不了
# onBeforeMount
页面挂载之前
1
2
3
4
5
6
7
8
9
10
| <script setup>
import {onBeforeMount, onMounted, onUnmounted, ref, watch, watchEffect} from 'vue'
onBeforeMount(()=>{
console.log(111);
debugger;
})
</script>
<template>
<div ref="div">数据</div>
</template>
|
这个例子可以看到控制台打印了 111 而没有页面,执行停止在 debugger
# onBeforeMount
组件挂载之前
# onMounted
组件挂载完成后
1
2
3
4
5
6
7
8
9
10
11
12
13
14
15
| <script setup>
import {onBeforeMount, onMounted, onUnmounted, ref, watch, watchEffect} from 'vue'
onBeforeMount(()=>{
console.log(111);
debugger;
})
onMounted(()=>{
console.log(222);
debugger;
})
</script>
<template>
<div ref="div">数据</div>
</template>
|
111 打印后渲染出 div 在打印 222
# onBeforeUpdate
更新之前
1
2
3
4
5
6
7
8
9
10
11
12
| <script setup>
import {onBeforeMount, onBeforeUpdate, onMounted, onUnmounted, ref, watch, watchEffect} from 'vue'
const a=ref(true)
onBeforeUpdate(()=>{
console.log('onBeforeUpdate')
debugger
})
</script>
<template>
<div v-if="a">数据</div>
<button @click="a=!a">按钮</button>
</template>
|
可以看到在页面还没有隐藏之前打印了 onBeforeUpdate
# onUpdated
更新之后
1
2
3
4
5
6
7
8
9
10
11
12
| <script setup>
import {onBeforeMount, onBeforeUpdate, onMounted, onUnmounted, onUpdated, ref, watch, watchEffect} from 'vue'
const a=ref(true)
onUpdated(()=>{
console.log('onUpdated')
debugger
})
</script>
<template>
<div v-if="a">数据</div>
<button @click="a=!a">按钮</button>
</template>
|
可以看到在隐藏掉 div 后才打印的 onUpdated
在组件因为响应式状态变更而更新其 DOM 树之后调用
不要在 updated 钩子中更改组件的状态,这可能会导致无限的更新循环!
# onBeforeUnmount
组件卸载之前 (卸载:v-if 切换或者跳转到新的页面没有这个组件了)
写在被卸载的组件中
# unmounted
组件卸载之后
写在被卸载的组件中
# 组件的定义和使用
在 components 目录中新建组件
SubComponent.vue
1
2
3
| <template>
<div>子组件</div>
</template>
|
App.vue 中引用
两种调用方式都是可以的
1
2
3
4
5
6
7
8
| <script setup>
import SubComponent from "@/components/SubComponent.vue";
</script>
<template>
<div>父组件</div>
<SubComponent/>
<sub-component/>
</template>
|
# 父组件传递参数给子组件
子组件通过 defineProps () 获取父组件在标签中给的属性
子组件
SubComponent.vue
1
2
3
4
5
6
7
| <script setup>
defineProps(["data"])
</script>
<template>
<div>子组件</div>
<div>data:{{ data }}</div>
</template>
|
父组件
App.vue
1
2
3
4
5
6
7
| <script setup>
import SubComponent from "@/components/SubComponent.vue";
</script>
<template>
<div>父组件</div>
<SubComponent data="abcd"/>
</template>
|
# 父组件传递方法给子组件
子组件
SubComponent.vue
1
2
3
4
5
6
7
| <script setup>
defineProps(["fun"])
</script>
<template>
<div>子组件</div>
<button @click="fun">子组件的按钮</button>
</template>
|
父组件
App.vue
1
2
3
4
5
6
7
8
9
10
| <script setup>
import SubComponent from "@/components/SubComponent.vue";
const addClick=()=>{
console.log("父组件的方法")
}
</script>
<template>
<div>父组件</div>
<SubComponent :fun="addClick"/>
</template>
|
# 父组件监听子组件的方法执行
子组件
SubComponent.vue
1
2
3
4
5
6
7
| <script setup>
defineEmits(["fun"])
</script>
<template>
<div>子组件</div>
<button @click="$emit('fun','参数')">子组件的按钮</button>
</template>
|
父组件
App.vue
1
2
3
4
5
6
7
8
9
10
11
12
| <script setup>
import SubComponent from "@/components/SubComponent.vue";
const click1=(n)=>{
console.log("父组件的方法")
// 打印的是'参数'
console.log(n)
}
</script>
<template>
<div>父组件</div>
<SubComponent @fun="click1"/>
</template>
|
# 插槽
# defineExpose
子组件抛出参数给父组件使用
子组件
SubComponent.vue
1
2
3
4
5
| <script setup>
import {ref} from "vue";
const a=ref(0)
defineExpose({a})
</script>
|
父组件
App.vue
1
2
3
4
5
6
7
8
9
10
11
| <script setup>
import SubComponent from "@/components/SubComponent.vue";
import {ref} from "vue";
// ''重要
const subRef=ref('')
</script>
<template>
<div>父组件</div>
<SubComponent ref="subRef"/>
<div>{{subRef.a}}</div>
</template>
|
# 插槽 slot
1
2
3
4
5
6
7
8
9
| <!--子组件-->
<template>
<slot></slot>
</template>
<!--父组件-->
<SubComponent>
需要插的值
</SubComponent>
|
# 组件的注册
全局注册
1
2
3
4
5
6
7
|
import { createApp } from 'vue'
import App from './App.vue'
import SubComponent from "@/components/SubComponent.vue";
const app=createApp(App)
app.component("SubComponent",SubComponent)
app.mount('#app')
|
不必要的文件体积
全局注册,但并没有被使用的组件无法在生产打包时被自动移除 (也叫 tree-shaking", 如果你全局注册了一个组件,即使它并没有被实际使用,
它仍然会出现在打包后的 JS 文件中。
难维护
全局注册在大型项目中使项目的依赖关系变得不那么明确,在父组件中使用子组件时,不太容易定位子组件的实现,和使用过多的全局变量一
样,这可能会影响应用长期的可维护性
局部注册
在需要的页面
1
| import SubComponent from "@/components/SubComponent.vue";
|
# Props
给子组件传参
1
2
3
4
5
6
7
8
9
| <script setup>
import SubComponent from "@/components/SubComponent.vue";
import {ref} from "vue";
const xd = ref("data")
</script>
<template>
<div>父组件</div>
<SubComponent :abc="xd"/>
</template>
|
1
2
3
4
5
6
7
8
| <script setup>
import {ref} from "vue";
defineProps(['abc'])
</script>
<template>
<h2>子组件</h2>
<div>{{abc}}</div>
</template>
|
# 字典声明
1
2
3
4
5
6
7
8
9
10
| <script setup>
import {ref} from "vue";
const props = defineProps({
abc: String
})
</script>
<template>
<h2>子组件</h2>
<div>{{abc}}</div>
</template>
|
静态和动态
1
2
| <SubComponent abc="data"/>
<SubComponent :abc="xd"/>
|
静态不能使用 ref 变量只能把要传的写在 "" 中间
动态可以使用 ref 变量
单项数据流
不能在子组件修改
props 是只读的
# defineModel
场景:当用 props 传递的父组件维护的变量到子组件时,想要双向绑定到子组件的的标签中
1
2
3
4
5
6
7
8
9
10
11
12
| <script setup>
import SubComponent from "@/components/SubComponent.vue";
import {ref} from "vue";
const a = ref("adata")
const b = ref("bdata")
</script>
<template>
<div>父组件</div>
<div>{{a}}</div>
<div>{{b}}</div>
<SubComponent v-model:a="a" v-model:b="b"/>
</template>
|
1
2
3
4
5
6
7
8
9
| <script setup>
const a = defineModel('a')
const b = defineModel('b')
</script>
<template>
<h2>子组件</h2>
<input v-model="a" />
<input v-model="b" />
</template>
|
# 依赖注入 (provide+inject)
给更深处的子组件传参
1
2
3
4
5
6
7
8
9
10
11
| <script setup>
import SubComponent from "@/components/SubComponent.vue";
import {provide, ref} from "vue";
const a = ref("adata")
provide("a",a);
</script>
<template>
<div>父组件</div>
<div>{{a}}</div>
<SubComponent/>
</template>
|
1
2
3
4
5
6
7
8
| <script setup>
import {inject} from "vue";
const a = inject('a')
</script>
<template>
<h2>子组件</h2>
<div>{{a}}</div>
</template>
|
也可以注册到全局
main.js
1
2
3
4
5
6
7
|
import { createApp } from 'vue'
import App from './App.vue'
const app=createApp(App)
app.provide('a','123331')
app.mount('#app')
|
# 依赖注入修改值和传递方法
依赖注入的值是可以在子组件修改的但是官方推荐在父组件定义方法传递给子组件
1
2
3
4
5
6
7
8
9
10
11
12
13
14
| <script setup>
import SubComponent from "@/components/SubComponent.vue";
import {provide, ref} from "vue";
const count = ref(0)
const addCount=()=>{
count.value++
}
provide("a",{count,addCount});
</script>
<template>
<div>父组件</div>
<div>{{count}}</div>
<SubComponent/>
</template>
|
1
2
3
4
5
6
7
8
| <script setup>
import {inject} from "vue";
const {count,addCount} = inject('a')
</script>
<template>
<h2>子组件</h2>
<button @click="addCount">{{count}}</button>
</template>
|
# 依赖注入传递给子组件只读
用 readonly 包裹一下
1
| provide("a",readonly(count));
|
# KeepAlive
在多个组件间动态切换时缓存被移除的组件实例
一个组件实例在被替换掉后会被销毁。这会导致它丢失其中所有已变化的状态 —— 当这个组件再一次被显示时,会创建一个只带有初始状态的新实例
1
2
3
4
5
6
7
8
9
10
11
12
| <script setup>
import {ref} from "vue";
import SubComponent from "@/components/SubComponent.vue";
import SubComponent2 from "@/components/SubComponent2.vue";
const is = ref(true)
</script>
<template>
<div>父组件</div>
<keep-alive><SubComponent v-if="is"/></keep-alive>
<SubComponent2 v-if="!is"/>
<button @click="is=!is">切换</button>
</template>
|
1
2
3
4
5
6
7
8
| <script setup>
import {ref} from "vue";
const count=ref(0)
</script>
<template>
<div>子组件1</div>
<button @click="count++">{{count}}</button>
</template>
|
1
2
3
4
5
| <script setup>
</script>
<template>
<div>子组件2</div>
</template>
|
这样子组件 1 维护的 count 就可以在子组件 1 切换销毁也存在
或者不用 v-if 使用 v-show,v-show 不会销毁组件,这样可以不用 keepalive
# vueRouter 路由
# 安装
1
| cnpm install vue-router@4
|
新建 src/router/index.js
1
2
3
4
5
6
7
8
9
10
11
12
13
14
15
| import { createRouter,createWebHashHistory} from "vue-router";
import SubComponent from "@/components/SubComponent.vue";
import SubComponent2 from "@/components/SubComponent2.vue";
const routes=[
{path:'/one',component:SubComponent},
{path:'/two',component:SubComponent2},
]
const router = createRouter({
history:createWebHashHistory(),
routes
})
export default router;
|
注册全局
1
2
3
4
5
6
7
|
import { createApp } from 'vue'
import App from './App.vue'
import router from "@/router/index.js";
const app=createApp(App)
app.use(router)
app.mount('#app')
|
使用 router-link 和渲染 router-view
1
2
3
4
5
6
7
8
9
10
11
12
| <script setup>
</script>
<template>
<div>父组件</div>
<p>
<router-link to="/one">打开组件1</router-link>
<router-link to="/two">打开组件2</router-link>
</p>
<div>
<router-view></router-view>
</div>
</template>
|
# 嵌套路由
注册路由在组件 2 中
1
2
3
4
5
6
7
8
9
10
11
12
13
14
15
16
17
18
19
20
21
22
23
24
25
| import { createRouter,createWebHashHistory} from "vue-router";
import SubComponent from "@/components/SubComponent.vue";
import SubComponent2 from "@/components/SubComponent2.vue";
import SubComponent3 from "@/components/SubComponent3.vue";
const routes=[
{path:'/one',component:SubComponent},
{
path:'/two',
component:SubComponent2,
children:[
{
path:'three',
component:SubComponent3
}
]
},
]
const router = createRouter({
history:createWebHashHistory(),
routes,
})
export default router;
|
添加点击链接
1
2
3
4
5
6
7
8
9
10
11
12
13
| <script setup>
</script>
<template>
<div>父组件</div>
<p>
<router-link to="/one">打开组件1</router-link>
<router-link to="/two">打开组件2</router-link>
<router-link to="/two/three">打开组件3</router-link>
</p>
<div>
<router-view></router-view>
</div>
</template>
|
在组件 2 中添加渲染
1
2
3
4
5
6
| <script setup>
</script>
<template>
<div>子组件2</div>
<router-view></router-view>
</template>
|
# 编程式导航
1
2
3
4
5
6
7
8
9
10
11
12
13
14
15
16
17
| <script setup>
import router from "@/router/index.js";
const routerChange = (n)=>{
router.push(n)
}
</script>
<template>
<div>父组件</div>
<p>
<button @click="routerChange('/one')">打开组件1</button>
<button @click="routerChange('/two')">打开组件2</button>
<button @click="routerChange('/two/three')">打开组件3</button>
</p>
<div>
<router-view></router-view>
</div>
</template>
|
router.push () 参数
router.push ({path:‘/one’})
也是可以的或者路由中定义了 name
router.push({name:‘one’})
# 重定向
1
2
3
4
5
6
7
8
9
10
11
12
13
14
15
16
17
18
19
20
21
22
23
24
| import { createRouter,createWebHashHistory} from "vue-router";
import SubComponent from "@/components/SubComponent.vue";
import SubComponent2 from "@/components/SubComponent2.vue";
import SubComponent3 from "@/components/SubComponent3.vue";
const routes=[
{path: "/",redirect:'/one'},
{path:'/one',component:SubComponent},
{
path:'/two',
component:SubComponent2,
children:[
{
path:'/three',
component:SubComponent3
}
]
},
]
const router = createRouter({
history:createWebHashHistory(),
routes,
})
export default router;
|
# 路由传参
# query
1
2
3
4
5
6
7
8
9
10
11
12
13
| <script setup>
</script>
<template>
<div>父组件</div>
<p>
<router-link to="/one">打开组件1</router-link>
<router-link to="/two?a=111&b=222">打开组件2</router-link>
<router-link :to="{ path:'/two/three',query:{a:111,b:222}}">打开组件2</router-link>
</p>
<div>
<router-view></router-view>
</div>
</template>
|
1
2
3
4
5
6
7
8
9
| <script setup>
import {useRoute} from "vue-router";
const route = useRoute();
</script>
<template>
<div>子组件2</div>
<span>{{route.query.a}}</span>
<router-view></router-view>
</template>
|
# params
1
2
3
4
5
6
7
8
9
10
11
12
13
| <script setup>
</script>
<template>
<div>父组件</div>
<p>
<router-link to="/one">打开组件1</router-link>
<router-link :to="{ name:'two',params:{a:111}}">打开组件2</router-link>
<router-link to="/two/three">打开组件2</router-link>
</p>
<div>
<router-view></router-view>
</div>
</template>
|
1
2
3
4
5
6
7
8
9
| <script setup>
import {useRoute} from "vue-router";
const route = useRoute();
</script>
<template>
<div>子组件2</div>
<span>{{route.params.a}}</span>
<router-view></router-view>
</template>
|
1
2
3
4
5
6
7
8
9
10
11
12
13
14
15
16
17
18
19
20
21
22
23
| import { createRouter,createWebHashHistory} from "vue-router";
import SubComponent from "@/components/SubComponent.vue";
import SubComponent2 from "@/components/SubComponent2.vue";
import SubComponent3 from "@/components/SubComponent3.vue";
const routes=[
{path:'/one',component:SubComponent},
{
path:'/two/:a',
name: 'two',
component:SubComponent2,
children:[
{
path:'/three',
component:SubComponent3
}
]
},
]
const router = createRouter({
history:createWebHashHistory(),
routes,
})
export default router;
|
# 编程式导航传参
1
2
3
4
5
6
7
8
9
10
11
12
13
14
15
16
17
18
19
20
| <script setup>
import router from "@/router/index.js";
const routerChange = (n,obj={})=>{
router.push({
path:n,
query:obj
})
}
</script>
<template>
<div>父组件</div>
<p>
<button @click="routerChange('/one')">打开组件1</button>
<button @click="routerChange('/two',{a:12345})">打开组件2</button>
<button @click="routerChange('/two/three')">打开组件3</button>
</p>
<div>
<router-view></router-view>
</div>
</template>
|
1
2
3
4
5
6
7
8
9
| <script setup>
import {useRoute} from "vue-router";
const route = useRoute();
</script>
<template>
<div>子组件2</div>
<span>{{route.query.a}}</span>
<router-view></router-view>
</template>
|
# 历史记录模式
哈希模式:createWebHashHistory () 推荐
html5 模式:createWebHistory ()
# 导航守卫
router.beforeEach((to, from, next)
1
2
3
4
5
6
7
8
9
10
11
12
13
14
15
16
17
18
19
20
21
22
23
24
25
26
27
28
29
30
31
32
33
34
35
36
37
38
| import { createRouter,createWebHashHistory} from "vue-router";
import SubComponent from "@/components/SubComponent.vue";
import SubComponent2 from "@/components/SubComponent2.vue";
import SubComponent3 from "@/components/SubComponent3.vue";
const routes=[
{path: "/",redirect:'/one'},
{path:'/one',component:SubComponent},
{
path:'/two',
name: 'two',
component:SubComponent2,
children:[
{
path:'/three',
component:SubComponent3,
}
],
meta:{isAuth:true}
},
]
const router = createRouter({
history:createWebHashHistory(),
routes,
})
router.beforeEach((to, from, next)=>{
if(to.meta.isAuth){
if (localStorage.getItem("token") === "1"){
next();
}else {
alert("请先登录")
}
}else {
next();
}
})
export default router;
|
# 路由懒加载
component:()=> import(“@/components/SubComponent.vue”)
1
2
3
4
5
6
7
8
9
10
11
12
13
| import { createRouter,createWebHashHistory} from "vue-router";
const routes=[
{path: "/",redirect:'/one'},
{
path:'/one',
component:()=> import("@/components/SubComponent.vue")
},
]
const router = createRouter({
history:createWebHashHistory(),
routes,
})
export default router;
|
# 状态管理 - Pinia
跨组件页面共享状态
安装
注册全局
main.js
1
2
3
4
5
6
7
8
9
10
11
12
|
import { createApp } from 'vue'
import App from './App.vue'
import router from "@/router/index.js";
import {createPinia} from "pinia";
const pinia = createPinia()
const app=createApp(App)
app.use(router)
app.use(pinia)
app.mount('#app')
|
例如需要一个全局的计数器
//src/stores/counter.js
1
2
3
4
5
6
7
8
9
10
11
12
13
| import {defineStore} from "pinia";
import {computed, ref} from "vue";
export const useCounterStore=defineStore('counter',()=>{
const count =ref(0);
const addCount=()=>{
count.value++;
}
const doubleCount = computed(()=>{
return count.value * 2
})
return {count,addCount,doubleCount}
})
|
使用
1
2
3
4
5
6
7
8
9
| <script setup>
import {useCounterStore} from "@/stores/counter.js";
const counter = useCounterStore();
</script>
<template>
<div>子组件3</div>
<div @click="counter.addCount">{{counter.count}}</div>
</template>
|
# axios
安装
封装
src/api/request.js
1
2
3
4
5
6
7
8
9
10
11
12
13
14
15
16
17
18
19
20
21
22
23
24
25
26
27
28
29
30
31
32
33
34
35
36
37
38
39
40
41
42
| import axios from "axios";
import webConfig from '@/config/index.js'
const http=axios.create({
baseURL: 'http://localhost:8080/api/',
timeout:5000,
})
http.interceptors.request.use(function (config) {
return config;
}, function (error) {
return Promise.reject(error);
});
http.interceptors.response.use((response)=>{
return response;
},(error)=>{
return Promise.reject(error);
});
export default http
|
书写接口
/api/user.js
1
2
3
4
5
6
7
8
9
10
11
12
13
14
15
16
17
| import http from '@/api/request.js'
export const getList=(parse)=>{
return http({
url: "/getList",
method: "get",
params:{
...parse
}
})
}
export const getId=(id)=>{
return http({
url: "/getId/"+id,
method: "get",
})
}
|
然后就可以直接使用了